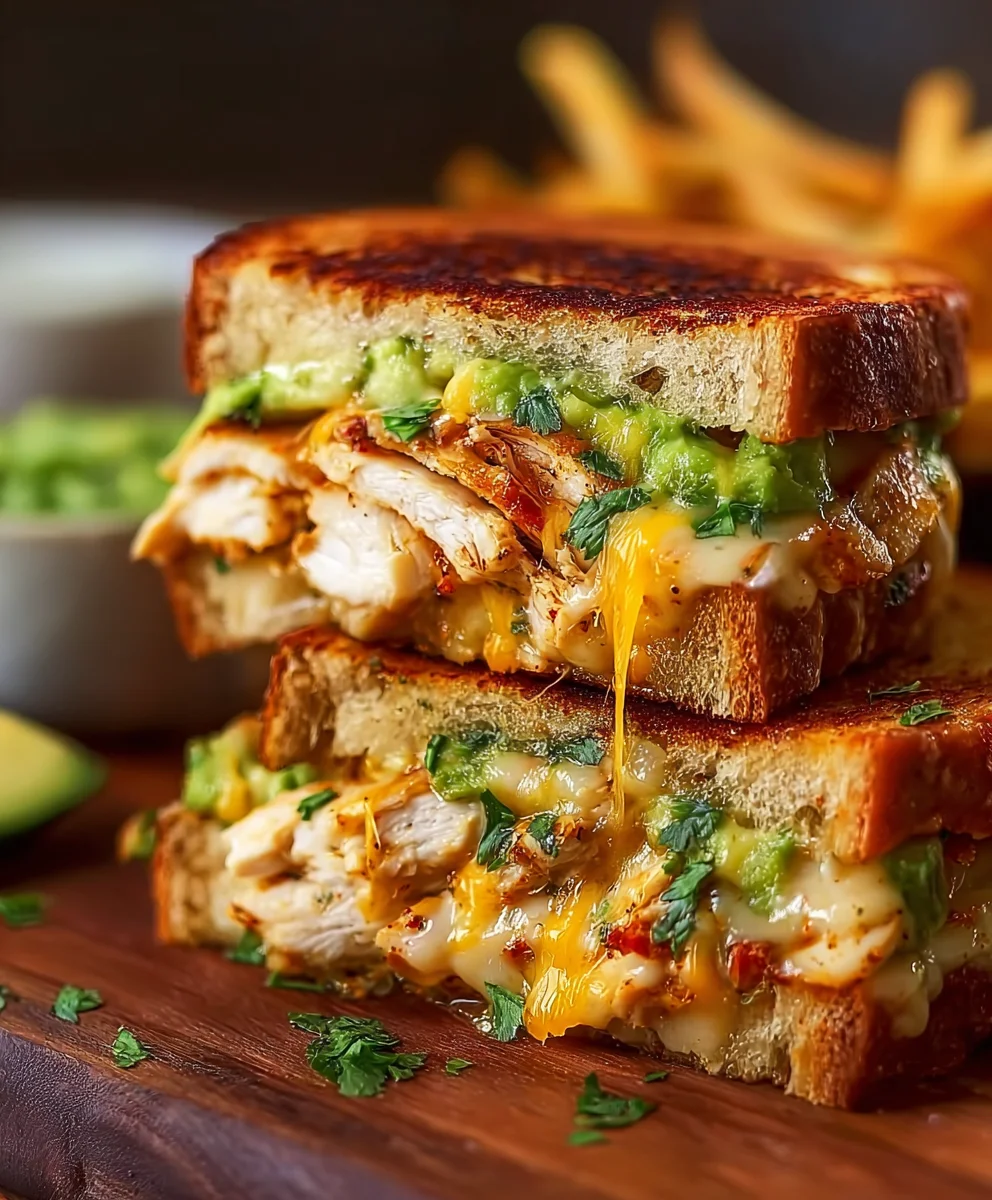
Chicken Avocado Melt Sandwich – just the name alone promises a symphony of textures and flavors that will elevate your next meal from simple to sublime. Imagine biting into perfectly toasted, golden-brown bread, giving way to tender, seasoned chicken, lusciously creamy avocado, and a generous layer of warm, gooey melted cheese. It’s a culinary embrace that satisfies on every level, offering that perfect blend of comfort and fresh vibrancy.
While the classic ‘melt’ sandwich has long been a beloved comfort food, a staple of diners and home kitchens for generations, our modern rendition truly elevates this humble classic. The ingenious inclusion of ripe, buttery avocado, a superfood celebrated for its rich healthy fats and silky texture, represents a delightful evolution, blending traditional comfort with a vibrant, contemporary twist. This Chicken Avocado Melt Sandwich bridges the gap between hearty satisfaction and fresh, wholesome indulgence.
People adore this dish because it masterfully balances savory depth with a refreshing creaminess. The succulent chicken provides robust flavor, while the avocado adds a luxurious, smooth counterpoint, all brought together by the irresistible pull of perfectly melted cheese. It’s a quick, convenient, and incredibly satisfying option that delivers a truly memorable taste experience, making it an ideal choice for a delightful lunch or a fuss-free dinner. I’m confident this recipe will become a new favorite in your kitchen!
Ingredients:
- Cooked Chicken: Approximately 2 cups, shredded or finely diced. I often use leftover roasted chicken, or I’ll quickly poach and shred a couple of chicken breasts. A rotisserie chicken is also a fantastic shortcut for this recipe!
- Ripe Avocados: 2 large, or 3 medium-sized. Look for avocados that yield slightly to gentle pressure when squeezed. They are the heart and soul of our “Chicken Avocado Melt Sandwich,” so choose wisely!
- Mayonnaise: ¼ cup. I recommend using a good quality, full-fat mayonnaise for the best creaminess and flavor. You can adjust this amount based on your desired consistency.
- Red Onion: ¼ cup, finely diced. The subtle sharpness of red onion adds a wonderful counterpoint to the richness of the avocado and chicken.
- Celery: ¼ cup, finely diced. This is my secret weapon for adding a delightful crunch and freshness to the filling, preventing it from being too uniform in texture.
- Fresh Cilantro: 2 tablespoons, finely chopped. If you’re a cilantro lover like me, don’t skimp here! It brings a bright, herbaceous note. If you’re not a fan, fresh parsley or chives could be a good substitute.
- Lime Juice: 1-2 tablespoons, freshly squeezed. This is crucial for both flavor and preventing the avocado from browning. It truly brightens up the entire filling.
- Salt and Black Pepper: To taste. Start with ½ teaspoon of salt and ¼ teaspoon of black pepper, then adjust as needed after tasting the mixture.
- Bread: 8 slices. My go-to choices for a Chicken Avocado Melt Sandwich are a sturdy sourdough, a rich brioche, or a classic whole wheat. Choose a bread that can stand up to the filling and grilling.
- Cheese: 4 slices. Provolone, Monterey Jack, sharp cheddar, or even a blend of mozzarella and cheddar work wonderfully. We want cheese that melts beautifully and adds a lovely savory layer.
- Unsalted Butter: 2-4 tablespoons, softened. This is for spreading on the outside of our bread to achieve that irresistible golden, crispy crust.
- Optional Additions: Sliced ripe tomato, a few pickled jalapeño slices for a kick, or a dash of your favorite hot sauce mixed into the filling.
Preparing the Creamy Chicken Avocado Filling
This is where the magic begins, creating the incredibly flavorful and satisfying core of our “Chicken Avocado Melt Sandwich.” Taking a little extra time here ensures a perfect outcome!
- Prepare Your Chicken: If you’re starting with raw chicken, I recommend poaching or baking it until fully cooked. For poaching, simply place chicken breasts in a pot, cover with water or broth, bring to a simmer, then reduce heat and cook for about 15-20 minutes, or until cooked through. Let it cool completely. Once cool, you can either shred it using two forks (which I find gives a lovely texture that holds the other ingredients well) or dice it into small, uniform pieces, about ¼ to ½ inch in size. Make sure your chicken is truly cooled down before mixing, as warm chicken can affect the texture and temperature of the avocado.
- Mash the Avocados: Carefully cut your ripe avocados in half, remove the pits, and scoop the creamy flesh into a medium-sized mixing bowl. Immediately add 1 tablespoon of the fresh lime juice. This isn’t just for flavor; the acid in the lime juice helps to prevent the avocado from oxidizing and turning brown, keeping our filling vibrant and appealing. Using a fork or a potato masher, gently mash the avocado to your desired consistency. I personally prefer a slightly chunky mash for a more interesting texture, but if you like it super smooth, go for it! Just avoid over-mashing to the point of a paste.
- Combine the Filling Ingredients: To the mashed avocado, add your prepared chicken, the ¼ cup of finely diced red onion, the ¼ cup of finely diced celery, and the 2 tablespoons of freshly chopped cilantro. These ingredients are essential for adding layers of flavor and texture that truly elevate our “Chicken Avocado Melt Sandwich.” The red onion provides a gentle sharpness, the celery offers a much-needed crunch, and the cilantro brings incredible freshness.
- Add Mayonnaise and Season: Now, gently fold in the ¼ cup of mayonnaise. Mix until all the ingredients are just combined and coated. Be careful not to overmix, as we want to preserve some of the avocado’s texture. Next, add ½ teaspoon of salt and ¼ teaspoon of freshly ground black pepper. This is a starting point.
- Taste and Adjust: This is a crucial step! Take a small spoonful of your chicken avocado mixture and taste it. Does it need more salt to bring out the flavors? Perhaps a little more pepper for a gentle kick? Does it feel like it needs a bit more zing? Add the remaining tablespoon of lime juice if desired. You might even consider a tiny pinch of garlic powder or a half-teaspoon of Dijon mustard for an extra layer of complexity. Remember, achieving the perfect flavor profile for your “Chicken Avocado Melt Sandwich” filling is all about personal preference. Once you’re happy with the seasoning, set the filling aside. It can be made a few hours in advance and kept refrigerated, though I find it’s best when used relatively fresh.
Building Your Perfect Chicken Avocado Melt Sandwich
Assembling the “Chicken Avocado Melt Sandwich” might seem straightforward, but a few simple techniques can make all the difference in achieving a perfectly grilled and gloriously gooey result.
- Choose Your Bread Wisely: Lay out your 8 slices of bread on a clean work surface. As I mentioned in the ingredients, the type of bread you choose significantly impacts the final taste and texture of your “Chicken Avocado Melt Sandwich.” A sturdy bread like sourdough won’t get soggy, while brioche offers a lovely richness. Ensure your slices are of a medium thickness, not too thin that they fall apart, and not too thick that they overwhelm the filling.
- Butter the Bread (The Outside!): Take your softened unsalted butter and generously spread a thin, even layer on one side of each of the 8 bread slices. This buttered side will be the exterior of your sandwich, the part that makes contact with the hot pan. This is absolutely key for achieving that beautiful, golden-brown, crispy crust that is characteristic of an exceptional grilled cheese or melt. If your butter isn’t soft enough, it can tear the bread, so plan ahead and let it sit at room temperature for a bit.
- Start Building the Base: Place four slices of your buttered bread, butter-side down, onto your work surface. These will be the bottom halves of your two “Chicken Avocado Melt Sandwiches.”
- Generously Apply the Filling: Divide your creamy chicken avocado filling evenly between these four slices. Spread a generous layer of the filling onto the unbuttered side of each bread slice. Don’t be shy here! The filling is the star, and we want a substantial amount in every bite. Aim for about ½ to ¾ inch thick layer. Ensure it’s spread almost to the edges but leaves a tiny border to prevent too much spillage when melting.
- Layer the Cheese: Now, on top of the chicken avocado filling, place one slice of your chosen cheese on each of the four bread bases. If you’re using a blend or shredded cheese, aim for an even layer. The cheese acts as a delicious glue, holding the filling in place as it melts, and of course, adding that incredible gooey factor that makes this a “melt.”
- Add Optional Extras: If you’re including sliced tomatoes, pickled jalapeños, or any other thin additions, now is the time to layer them on top of the cheese. I often put tomatoes directly on the cheese so they warm through slightly without making the bread soggy.
- Complete the Sandwich: Finally, take the remaining four buttered bread slices and place them butter-side up on top of the cheese and filling layers, completing your two “Chicken Avocado Melt Sandwiches.” Gently press down on each sandwich with the palm of your hand to compact it slightly. This helps the layers adhere and makes it easier to handle during cooking.
Cooking the Golden Chicken Avocado Melt
Cooking this “Chicken Avocado Melt Sandwich” to perfection requires a bit of patience and a watchful eye. The goal is a beautifully golden-brown crust and perfectly melted, gooey cheese without burning the bread.
- Preheat Your Pan: Place a large non-stick skillet or a cast-iron pan over medium-low heat. It’s crucial not to rush this step by using high heat. A medium-low heat allows the bread to toast slowly to a beautiful golden brown while giving the cheese ample time to melt thoroughly from within. If the pan is too hot, the bread will burn before the cheese has a chance to get gloriously gooey.
- Place the Sandwiches: Once your pan is warm (you can test it by flicking a tiny bit of water; it should sizzle gently), carefully place your assembled “Chicken Avocado Melt Sandwiches” into the pan. If your pan is large enough, you can cook both at once. If not, cook them one at a time to avoid overcrowding, which can lower the pan temperature and result in uneven cooking.
- Cook the First Side: Let the sandwiches cook undisturbed for about 3-5 minutes. During this time, the buttered side will start to crisp up and turn golden. I often like to use a spatula to gently press down on the sandwiches every minute or so. This light pressing ensures even contact with the hot pan, promoting consistent browning and helping the cheese inside to melt more efficiently. Don’t press too hard, or you’ll squeeze out the filling!
- Check and Flip: After 3-5 minutes, carefully lift one corner of a sandwich with your spatula to check its color. You’re looking for a rich, golden-brown hue. Once it reaches this point, use your spatula to gently flip the “Chicken Avocado Melt Sandwich” over to the second buttered side.
- Cook the Second Side (and Melt the Cheese!): Continue cooking for another 3-5 minutes on the second side, again gently pressing with the spatula periodically. This side needs the same golden-brown perfection. While this side is cooking, the heat will penetrate the sandwich and work its magic on the cheese, turning it into a beautiful, molten layer. If you find your bread is browning too quickly, slightly reduce the heat. If the cheese isn’t melting as fast as you’d like, you can briefly cover the pan with a lid for the last minute or two of cooking; this traps the heat and encourages the cheese to melt faster, but watch it carefully to prevent sogginess.
- Signs of Perfection: Your “Chicken Avocado Melt Sandwich” is ready when both sides are beautifully golden brown and crispy, and the cheese inside is completely melted and oozing enticingly when you press lightly on the top. The aroma filling your kitchen will also be a pretty good indicator!
Serving and Enjoying Your Chicken Avocado Melt Sandwich
You’ve done the hard work, and now it’s time for the delicious reward. Serving your “Chicken Avocado Melt Sandwich” properly ensures every bite is as satisfying as it looks.
- Allow to Rest Briefly: Once your “Chicken Avocado Melt Sandwiches” are perfectly golden and the cheese is gloriously melted, transfer them from the pan to a cutting board. I know it’s tempting to dive right in, but allow them to rest for just 1-2 minutes. This brief resting period allows the cheese to set slightly, making the sandwich easier to slice and preventing the filling from completely oozing out when you cut into it. It also lets the internal heat distribute evenly.
- Slice for Perfection: Using a sharp chef’s knife or a serrated knife, slice each “Chicken Avocado Melt Sandwich” diagonally. Slicing on the diagonal isn’t just for classic diner presentation; it also makes the sandwich easier to handle and eat, exposing the beautiful layers of filling and melted cheese.
- Garnish and Serve Immediately: A sprinkle of extra fresh cilantro or a small wedge of lime on the side can add a lovely final touch. These sandwiches are absolutely at their peak when served immediately, while they are still warm, the bread is crispy, and the cheese is wonderfully gooey. This is when the “Chicken Avocado Melt Sandwich” truly shines.
- Pairing Suggestions: While these melts are incredibly satisfying on their own, they pair wonderfully with a simple green salad, a cup of tomato soup (the classic pairing!), or even just a handful of your favorite potato chips and a crisp pickle spear. Enjoy every delicious, creamy, crunchy, cheesy bite of your homemade creation!

Conclusion:
And there you have it, my friends! We’ve reached the grand finale of our culinary adventure, and I truly hope you’re as excited as I am about what you’ve just discovered. This isn’t just any sandwich recipe; it’s a game-changer, a lunchtime hero, and a dinner delight all rolled into one gloriously cheesy, creamy, and satisfying package. I can confidently say that if you’re looking for a meal that hits all the right notes – savory, fresh, comforting, and utterly delicious – then you simply must give this recipe a try. It’s incredibly easy to prepare, making it perfect for a quick weekday lunch when you need something substantial without spending hours in the kitchen, or a delightful weekend brunch that feels a little bit special. The combination of tender, flavorful chicken, rich, buttery avocado, and beautifully melted cheese, all encased in perfectly toasted bread, creates a symphony of textures and tastes that is truly unforgettable. It’s a recipe that promises to elevate your everyday meals from mundane to magnificent, and I stand by it 100%.
I’ve made countless sandwiches in my time, but the Chicken Avocado Melt Sandwich holds a particularly special place in my heart. It’s the kind of dish that brings a smile to my face with every single bite. The way the creamy avocado provides a luxurious counterpoint to the savory chicken, and how the gooey, melted cheese binds everything together in a warm embrace, is just pure culinary magic. It’s versatile, comforting, and consistently delivers a deeply satisfying experience. Believe me, once you sink your teeth into one of these, you’ll understand exactly why I’m so enthusiastic about it.
Elevate Your Meal: Serving Suggestions and Delicious Variations
Now, let’s talk about how to make this already fantastic sandwich even better, or how to customize it to your heart’s content. While this Chicken Avocado Melt Sandwich is substantial enough to be a meal on its own, it also pairs beautifully with a variety of sides. For a light and refreshing complement, I love serving it alongside a crisp green salad with a zesty vinaigrette – the brightness really cuts through the richness of the sandwich. A classic cup of creamy tomato soup or a hearty lentil soup makes for a wonderfully comforting pairing, especially on a chilly day. You could also opt for some homemade potato chips, a simple side of fruit salad, or even some crunchy vegetable sticks with a ranch dip for a lighter touch. Don’t be afraid to experiment!
The beauty of this recipe, much like many great comfort foods, lies in its adaptability. Feeling adventurous? Here are some variations I absolutely adore and encourage you to try:
- Cheese Power-Up: While cheddar or Monterey Jack are fantastic, try swapping them for a smoky provolone, a sharp Swiss, or even a spicy pepper jack for an extra kick. A blend of cheeses can also create a more complex flavor profile.
- Bacon Bliss: Let’s be honest, everything is better with bacon! Adding a couple of crispy strips of bacon elevates the savory factor and adds a delightful crunch.
- Veggie Boost: Thinly sliced tomatoes, a few rings of red onion for a subtle bite, or even some fresh spinach or sprouts can add more texture and freshness.
- Bread Choices: While a good sourdough or rustic white bread works wonders, don’t limit yourself! A hearty whole wheat, a chewy ciabatta, or even a thick-cut Texas toast can completely change the experience. For a low-carb option, consider wrapping the chicken and avocado mixture in large lettuce leaves – it’s surprisingly delicious!
- Spice It Up: A dash of smoked paprika, a pinch of chili flakes, or a tiny sprinkle of garlic powder mixed in with the chicken and avocado can add subtle layers of flavor.
- Herbaceous Twist: Fresh chopped cilantro or chives can bring a lovely aromatic lift to the avocado mixture.
These are just a few ideas to get your creative juices flowing. Remember, cooking should be fun and reflective of your own tastes!
Your Turn: Make It and Share It!
Now that you have all the insider tips and tricks, it’s time to roll up your sleeves and get cooking! I genuinely believe this recipe will become a cherished part of your culinary repertoire, a go-to for those moments when you crave something truly satisfying and incredibly flavorful. Don’t just read about it; experience the pure joy of making and devouring your very own Chicken Avocado Melt Sandwich. I can’t wait for you to discover how simple yet profoundly rewarding this dish is. Once you’ve whipped up your masterpiece, please, please, please come back and share your experience with me! Did you try a fun variation? What was your favorite part? Did your family rave about it? Leave a comment below, share your photos on social media, and tag me so I can see your delicious creations. Your feedback and stories are what make this community so vibrant and inspiring. Happy cooking, and I’m already looking forward to hearing all about your culinary triumphs!
Ultimate Chicken Avocado Melt Sandwich – Quick & Creamy!
Indulge in a quick and creamy Chicken Avocado Melt Sandwich, featuring tender seasoned chicken, a creamy mayonnaise and Dijon dressing, fresh avocado and tomato slices, and gooey melted cheese, all grilled between perfectly toasted bread for a comforting and satisfying meal.
Ingredients
-
2 boneless, skinless chicken breasts
-
1 tablespoon olive oil
-
Salt to taste
-
Black pepper to taste
-
2 tablespoons mayonnaise
-
1 tablespoon Dijon mustard
-
1 small red onion, thinly sliced
-
1 avocado, sliced
-
1 tomato, sliced
-
4 slices of bread (e.g., sourdough, ciabatta)
-
4 slices of cheese (e.g., Swiss, cheddar, provolone)
-
Butter or olive oil for grilling
Instructions
-
Step 1
Cook chicken breasts in 1 tbsp olive oil, seasoning with salt and pepper, until fully cooked. Let cool, then shred or dice. -
Step 2
In a bowl, combine the shredded chicken with mayonnaise and Dijon mustard. Mix well and season with additional salt and pepper if needed. -
Step 3
Thinly slice the red onion, avocado, and tomato. -
Step 4
Butter one side of each bread slice. On the unbuttered side of two bread slices, place one slice of cheese, then a generous layer of the chicken mixture, followed by the sliced avocado, tomato, and red onion. Top with a second slice of cheese, then complete with the remaining two bread slices, butter-side up. -
Step 5
Heat a skillet or pan over medium-low heat. Place sandwiches in the pan and grill for 3-5 minutes per side, or until the bread is golden brown and crispy, and the cheese is thoroughly melted and gooey. Gently press with a spatula during grilling for even contact. -
Step 6
Transfer the grilled sandwiches to a cutting board and let them rest for 1-2 minutes. Slice diagonally with a sharp knife and serve immediately to enjoy while warm and cheesy.
Important Information
Nutrition Facts (Per Serving)
It is important to consider this information as approximate and not to use it as definitive health advice.
Allergy Information
Please check ingredients for potential allergens and consult a health professional if in doubt.